Water cooled end caps installation
Water cooled end caps installation
You may be wondering how to go about placing your NASA-designed water-cooled end caps onto your process tube.
Follow the instructions below. If you have any questions, contact us.
The water-cooled tube seal must be attached to the top end of the ceramic process tube. When operating the furnace, water must be flowing at a suitable rate to keep the O-rings cool: one slpm per end cap.
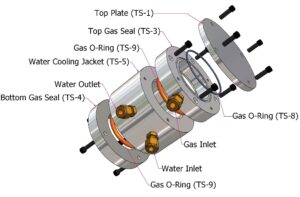
- Separate all seal components. (See Diagram).
- Slide each seal component onto the furnace tube in the order -and orientation- indicated. Note that the Top End Seal and the Bottom End Seal are similar. The Top End Seal has four tapped holes and an O-Ring groove, while the Bottom End Seal does not.
- Observe the diagram and orient the End Seals and the Water Jacket as shown.
- Coat the O-Rings with silicone base O-Ring lube before sliding them onto the furnace tube.
- Position the Top End Seal so that the furnace tube is recessed about ¼” down from the O-Ring grooved face.
- Seat the Tube O-Ring against the Top End Seal. Seat the Water Jacket against the Tube O-Ring.
- Use four Seal Bolts to attach the Top End Seal to the Water Jacket. Using a torque pattern, begin tightening the bolts (maintaining an even spacing between the Top End Seal and the Water Jacket), adjusting the position of the Top End Seal to maintain the ¼” recess to the process tube lip.
- Seat the remaining Tube O-Ring against the back fillet of the Water Jacket. Seat the Bottom End Seal against the Tube O-Ring. Use four Seal Bolts to attach the Bottom End Seal to the Water Jacket. Using a torque pattern begin tightening the bolts (maintaining an even spacing between the Bottom End Seal and the Water Jacket), adjusting the position of the Top End Seal to maintain the 1/4″ process tube recess as the bolts are being tightened.
- The Top and Bottom end Seals should be secured to the Water Jacket, compressing the Tube O-Rings against the ceramic tube.
- Using O-Ring Lube place the End Plate O-Ring into the Top End Seal, and attach the End Plate to the Top End Seal using four Seal Bolts.
Water Cooled End Cap
The Water Jacket has two ¼” pipe ports to attach a water coolant inlet and outlet. The Top End Seal has a ¼” pipe Gas Port for inlet or exhaust gas.
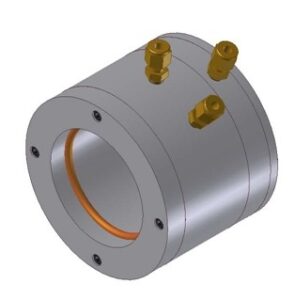
Water Cooled End Cap exterior view


